


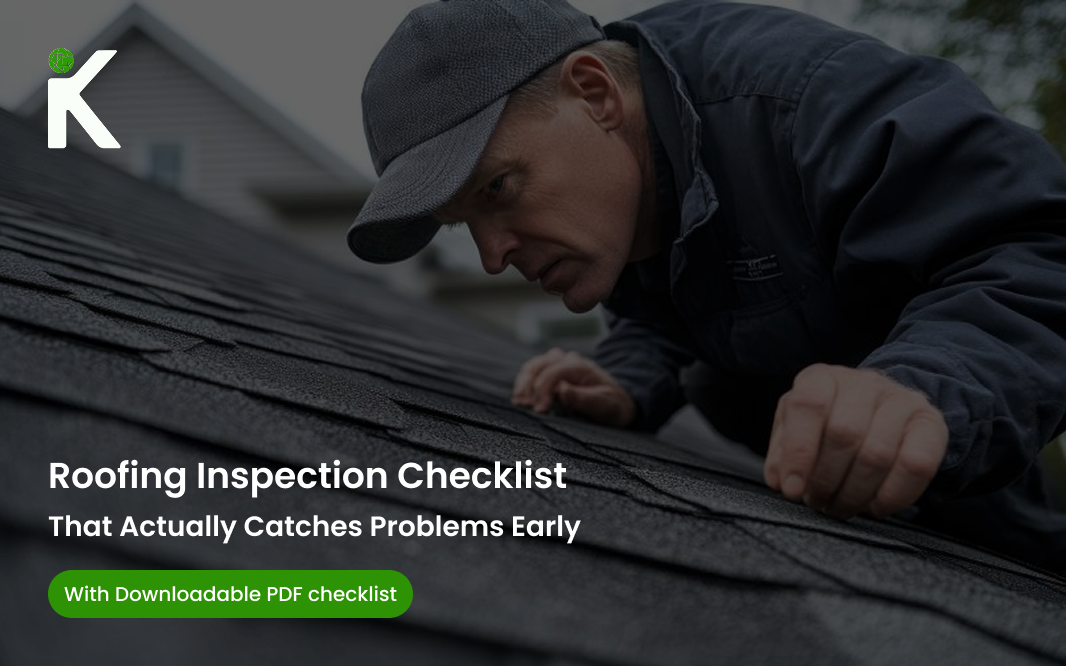
A roof can look totally fine from the street and still be one strong wind away from a leak. This is why when you go for a real roof inspection, you get something that is more than just a quick look from the ground. They check things the same way every time, so small issues don’t turn into big, expensive surprises later.
In this guide, you can see a simple roofing inspection checklist that you can use for your own home, or understand when a professional is inspecting your roof. It walks through what experienced roofers pay attention to, what they usually write down, which photos actually matter, and how nothing gets missed along the way.
We’re also including a downloadable PDF checklist with this article. You’ll see how to use it easily on its own, and how tools like Knockio‘s roofing sales CRM can help keep inspection notes, photos, and follow-ups all in one place if you prefer everything organized digitally.
Part 1: What a Roofing Inspection Is Really For
A roof inspection has three simple goals:
- Catch water problems early, before a small issue turns into a stain on the ceiling or a leak in your living space.
- Look for common trouble spots like flashing, seams, and areas where vents or pipes come through the roof. These are usually the first places to wear out.
- Keep a clear record of your roof’s condition so you can compare it later and understand what’s changed over time.
Many homeowners often check out their roofs when they notice a leak. But by then, the damage is already done, and repairs are more expensive and stressful. The best time to inspect is when the roof is dry and safe to walk on. That’s when issues like small cracks, lifted edges, loose fasteners, or worn-out sealant are easiest to spot.
This is why many commercial property owners make roof inspections part of regular maintenance. Changes in weather cause roofs to expand and contract, which can slowly open up new cracks or make old ones worse. If you get regular inspections done, they can help catch those issues early, before they turn into bigger problems.
When to Inspect Your Roof
Many experts recommend that you check your roof regularly and take another look when something out of the ordinary happens.
Most homeowners believe they should inspect their roofs twice a year, once in the spring and once in the fall. It’s also a good idea to check again after a big storm, or if you notice red flags like water sitting on the roof or new stains on your ceiling.
For commercial buildings, some experts suggest checking the roof every three months. These quarterly inspections help catch seasonal wear and tear early, especially as weather changes throughout the year.
Discover How Knockio Enhances Your Sales Strategys.
How Long Does a Roof Inspection Take
The total time that a roof inspection can take depends completely on the roof’s size, how easy it is to access, and how many vents, pipes, or other features it has. For most homes, a professional inspection usually takes about one to three hours. Whereas larger or more complex buildings may take a bit longer.
Part 2: Safety First, Because Roof Work Is Not Forgiving
Before jumping into the checklist, let’s do a quick reality check.
If you’re not trained or comfortable with heights, don’t climb. You can spot many problems from the ground, like missing shingles, sagging spots, clogged gutters, or bent flashing, with a camera zoom or binoculars.
If you do go up on the roof, safety comes first. OSHA’s fall-protection rules call for safeguards when there’s a risk of falling six feet or more, with specifics depending on the roof type and slope. The details vary depending on the roof, but the goal is simple: don’t risk a fall.
Basic Safety Checks to Do Every Time
These are simple things, but they go a long way toward preventing accidents:
- Make sure the ladder is in good condition and set up properly
- Wear non-slip shoes and gloves
- Look around for overhead power lines
- Use a harness or other fall protection when needed
- Check the weather, skip inspections during rain, strong winds, or lightning
This safety-first approach is exactly what professionals do in their OSHA-compliant inspection templates, keeping the process consistent and everyone safe.
Part 3: Tools and Notes You Should Bring
You don’t need any fancy gadgets or a high-end drone to keep an eye on your roof. Just grab a few basics, and you are good to go:
Simple Tool Kit
Grab some chalk or painter’s tape to mark cracks. Otherwise, you’ll lose them the second you look away. You also need a high-lumen flashlight for the attic, and a small mirror to see behind chimneys and ‘hard-to-see’ places. Your phone is your most important tool, and not just for notes. You should use it for taking 20 or 30 photos of anything that looks even slightly off.
Honestly, that’s all you need. Nothing fancy. With just these basics, you can spot issues before they turn into something big.
What to Document Every Single Time
If you want to remember one thing from this guide, let it be this: stop trusting your memory. Write these things down while you are standing there looking at your roof:
- Date and time
- What was the weather like?
- Roof type, and how old is it?
- Areas you inspected and exactly where the issue is. E.g., North-east corner near the chimney.
- Problems you found
- How much damage is: minor, moderate, or urgent
- Recommended next step. Do you need a caulk gun or a contractor?
Professionals do this “general information” section first in their checklists because it makes it easy for them to see how a roof ages.
Discover How Knockio Enhances Your Sales Strategys.
Part 4: The Roofing Inspection Checklist You Can Follow Step by Step
You should treat roof inspections like a little routine. Start from the curb, work your way closer, and finish inside. When you follow this flow, it makes it easier to connect the dots between what you see outside and any problems inside. Like, if you see a weird shingle outside, you’ll know exactly where to look for a water stain in the attic.
Download Roofing Inspection ChecklistExterior Inspection From Ground Level
Always start your inspection from the ground, even if you plan to climb later. Believe it or not, you can catch about 80% of problems without ever touching a ladder. Look around for any shingles that are missing, cracked, sliding, or curling like a potato chip. Also, pay attention to the roofline too. If you spot any unevenness or sagginess, that’s a bad sign and needs your immediate attention. Besides this, you should also look for streaky stains or “tiger stripes” on the roof or siding, because this often means that the gutters are overflowing and dumping water where they shouldn’t. Other than this, you should also check for piles of debris sitting in valleys or behind chimneys, and keep an eye out for tree branches rubbing against the roof. If you notice a bunch of these issues from the ground, it’s time to call a professional.
Roof Perimeter and Edges
The roof edges take the most wind first. So, if you ignore them, they can turn into serious leaks.
Here’s what you should look for:
- Fascia and soffits: Check the wood under the overhangs for any soft spots, rot, or peeling paint. This means that you have got rot to deal with.
- Drip edges: The metal edges should be tight and secure, and not lifting. If they are lifting, the wind will bring rain into your rafters.
- Any nails or fasteners sticking out or missing?
Many leaks actually start at the edges because wind can push water sideways and under weak metal. If you spot these early, you can save a ton of stress down the road.
Discover How Knockio Enhances Your Sales Strategys.
Roof Surface Check, Materials, and Visible Wear
Now, let’s come to the actual surface. What you’re basically looking for are signs of ‘aging, which means wear and how water behaves on the roof.
Asphalt Shingles
When you are checking out asphalt shingles, pay attention to what’s ending up in your gutters. If you see a lot of granules washing down, that’s often a sign that the shingles are wearing out. Besides this, also look for bald spots, small cracks, or tiny blisters on the surface. Also, gently press in a few areas to see if anything feels soft or spongy. If it does, then these signs help you see where shingles might be wearing out or where water could start causing problems before it becomes a leak.
Metal Roofing
If you have metal roofing, focus on the fasteners and seams. And, you should also check for screws that are loose or missing their washers. What’s more important is that you look closely for rust forming around those spots. On standing-seam roofs, keep an eye on seams that look like they’re starting to separate or pull apart. These issues might seem small, but if you catch them early, you can stop these little issues from turning into big headaches later.
Tile or Slate
With tile or slate roofs, watch out for any cracked pieces or tiles that have shifted out of place. You also need to pay close attention to broken corners that are especially common near valleys and along the edges. Even small damage here can lead to leaks, so spotting and fixing it early can save you from larger repairs down the road.
Flat Roof Membranes
If you have a flat roof, take a slow walk and look across the surface for blisters, bubbles, or wrinkles. This means that moisture is trapped underneath. Pay extra attention to areas where people walk on a lot, since tears tend to show up there first. And, glance along the seams and edges to make sure nothing is peeling up. Lastly, make sure to clear off any leaves, branches, or debris. Stuff like that can block drains and leave puddles sitting around, which can cause problems if left too long.
Drainage: Gutters, Downspouts, and Ponding Water
Water is your roof’s worst enemy, so your drainage has to be perfect. For that, you need to:
- Check gutters for leaves or shingles granules that could be clogging them
- Make sure downspouts aren’t crushed, disconnected, or blocked
- Look for water marks that show where overflow has happened
- Watch for low spots on flat roofs where water likes to sit
Professionals always stress that you check for standing water because it can point to slope problems and, if left unchecked, can lead to bigger damage over time.
Flashing and Penetrations: The Leak Hot Spots
If a roof is going to leak, it won’t just happen in the middle of the roof. Most leaks show up at a ‘penetration’, which is the spot where something passes through the roof, like a chimney, vent, or pipe. Take a careful look around chimneys, skylights, plumbing vent boots, HVAC units, satellite mounts, and roof drains on flat roofs. These are your primary leak zones. Also, check for cracked or dried-out sealant, small gaps, lifted flashing, or missing fasteners, as they are responsible for 90% of all residential leaks. These areas get extra attention from professionals because they’re the most common places where roof problems begin.
Walls, Parapets, and Terminations on Commercial Roofs
If you’re inspecting commercial buildings, make sure to include this section every time:
Check:
- Parapet wall caps and coping
- Termination bars and seals
- Cracks where walls meet the roof membrane
Pros often focus on parapet terminations because if the seals fail here, water can sneak in where you can’t see it. Catching these early can prevent hidden damage.
Interior Checks: Ceiling, Walls, and Attic
Finally, it’s time for you to go and play detective in the attic. This is where your roof will tell you a lot of things. So, just grab a flashlight and examine:
Ceiling and Walls
Start by checking the ceilings and walls for water stains, discoloration, or bubbling paint. Use your nose and see if you notice any musty smells because that would mean that your ventilation is probably failing, which “fries” your shingles from the inside out. Also, look closely near corners or vents where mold can quietly start to grow.
Attic Inspection
Next, move into the attic itself. Look for damp or soggy insulation, dark stains on the roof decking, or any daylight coming through small gaps. If you turn off the lights and see even a tiny pinhole of daylight, you’ve got a hole that water will find. Rusted nails or metal parts can also be a warning sign. While you’re there, check that bathroom fan ducts are venting outside and not blowing moist air directly into the attic.
Many professional inspection templates include an attic section because leaks often show up here before they reach your living space. If you spot them early, you can get a head start on repairs and save a lot of headaches later.
Discover How Knockio Enhances Your Sales Strategys.
Final Steps: Wrap Up Like a Pro
Don’t just dust your hands and walk away once you are done. You need to:
- Snap clear photos of every issue, plus one wider shot, so you remember where it was
- Write down how urgent it is and what should happen next
- Jot down any safety concerns you noticed
- Clean up any debris you created while checking things out
Professional templates often have a space for notes and homeowner acknowledgment sections. It might feel boring, but that paper trail really matters later.
| Option | Best for | What it does well | Where it falls short |
| Printable PDF | Quick starts | Easy to grab and go | They get lost or muddy; photos live elsewhere |
| Fillable Phone PDF | Solo inspectors | Faster than paper; no messy handwriting | Hard to share with a team or search later |
| Spreadsheets | Office tracking | Great for sorting data | Feels clunky on a ladder; hard to attach photos |
| CRM Mobile Form | Growing teams | Everything (photos/notes) stays in one spot | Requires a bit of initial setup |
The real problem with PDFs is that they’re easy to forget and end up buried somewhere in a folder, and disconnected from the customer. That’s why many teams move to digital forms or a CRM, which means less paperwork, less stress, and fewer details getting lost.
Part 5: How to Use Your Downloadable PDF Template Without Missing Things
A quick rule of thumb about a PDF checklist is that it only works if you use it the same way every time.
Make It a Routine, Not a One-Time File
On every inspection, start by filling in the basic info, then run through your safety checks. Work your way from the outside in, snapping photos as you go so nothing slips through the cracks. Most importantly, don’t leave the site until you’ve jotted down the next steps that you need to carry out. When you treat your checklist like a routine instead of a document, you will notice that inspections become quicker, cleaner, and way harder to mess up.
Add a Simple Severity Code
Use a simple color rating; it makes everything easier to understand:
Green: Everything looks fine. It’s just normal wear, though you need to keep an eye out for next year.
Yellow: Needs repair soon. It’s not a leak yet, but it will be if you ignore it.
Red: This is urgent. High risk of failure, or water is already getting in.
This kind of rating makes the inspection easy to understand for homeowners, property managers, and your own crew. This way, everyone’s on the same page without having to decode complicated technical language.
Part 6: Where Knockio Fits In, Without Turning This Into a Sales Pitch
When inspections are part of your roofing business, finding damage is usually the easy part. The real challenge is everything that comes after the inspection. Photos get lost in your camera roll, follow-ups get pushed to next week, and the office team usually doesn’t get the info they need to send an estimate quickly. This is where a simple system like Knockio can really help. It keeps your inspection forms, photos, and customer history in one place. It’s really just the digital version of a well-organized checklist, and follows the same idea as moving beyond PDFs, but applied to your day-to-day workflow so that your leads don’t stall out just because someone forgot to upload a photo.
Part 7: Final Takeaway
Your roofing checklist is more than just a chore. It’s actually a habit that protects your biggest investment.
When you check your roof regularly, stick to a schedule and keep good records, you stop reacting to emergencies and start staying ahead of them. You’ll find that as your documentation gets better, your problems remain small instead of turning into surprises.
A great way to start is with a simple PDF template to get things moving. But as you get busier and your workflow grows, you’ll probably want to move toward a more integrated system. Having your inspection notes, photos, and follow-ups all in one place makes life much easier.
That’s the secret to how the pros stay consistent and keep their cool, no matter what the weather is doing.
Should homeowners walk on the roof?
It’s better if they don’t. Unless you’re a pro, walking on a roof is risky, and not just for the shingles, but for you. Falls can be serious. You can actually spot about 90% of issues just by using a pair of binoculars from the ground or heading into your attic with a flashlight. If something looks off, that’s when you call in a professional.
How often should a roof be inspected?
The golden rule is to check it out twice a year, once in spring and once in fall. Think of it like a seasonal “wellness check” to make sure the winter snow or summer heat didn’t do any secret damage. You should also do a quick scan after any major storm, whether it was heavy wind or hail.
What is the most common place for leaks to start?
It is very rare for leaks to start in the middle of a flat row of shingles. They almost always happen at “transition points”. These are the spots where the roof meets something else. Keep a close eye on:
- Flashing: Those metal strips around chimneys or dormers.
- Penetrations: Vents, skylights, and pipes.
- Edges: The valleys and gutters where water naturally gathers.
Over time, the sealant in these spots cracks or shrinks, giving water an easy way in.
What should a roofing inspection report include?
If you hire someone to do an inspection, don’t just accept a verbal confirmation. A solid report should feel thorough and include:
- Safety & General Info: The age and type of roof.
- The Outside View: Condition of shingles, gutters, and drainage.
- The Inside View: Any signs of moisture or daylight in the attic.
- Evidence: Clear photos of any problem areas.
Next Steps: Clear recommendations on what needs fixing now versus what can wait.